Thursday, August 2, 2012

Lasagna for Me!

Dear B-Reader,

As you may already know, Jeff and I try to be a lactose-free household...and by many standards, we are relatively dairy-free as well to health reasons. My long-lost love, cheese, is always trying to seduce me, especially when I browse through the lovely Italian recipes in my cookbook collection. No more, dairy devil! I have conquered you in the lasagna battle with non-dairy ricotta!

Interested in trying your hand at this super-easy and very good-for-you recipe? Read on...

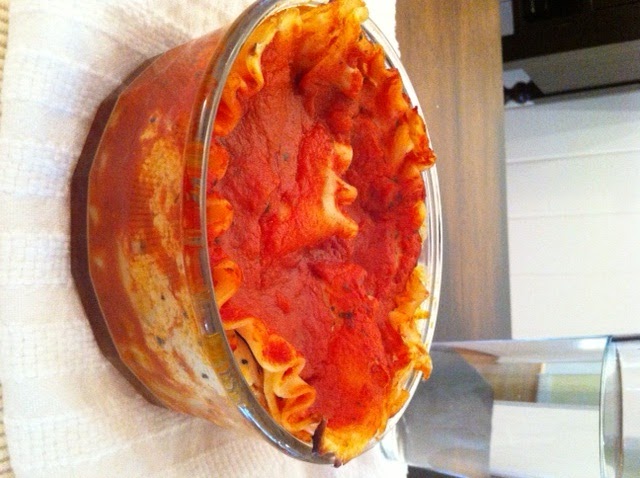
Non-Dairy Lasagna.
If any of my techy-type readers are able to address why this image is not rotated properly and how to correct, please let me know!

Non-Dairy Lasagna by Chalkaholic


For the dairy-free ricotta (adapted from http://cowsmilkisforcows.blogspot.com):

1 package silken tofu

2 tsp fresh lemon juice

2 tsp olive oil

1 clove, minced garlic

½ tsp salt

½ tsp pepper

½ tsp oregano and any other of your fave Italian herbs

2 Tbsp nutritional yeast (not baker’s yeast; find it in the vitamin section of Whole Foods)

For the lasagna:

Water

Salt

½ package of lasagna noodles (I love the Colavita Lasagne product, 17.64 oz package)

1 jar pasta sauce (Newman’s own marinara is delicious)

Make ricotta:

Process tofu by placing tofu blocks atop cutting board, sandwiching the tofu between several sheets of paper towel; press firmly using the back of a frying pan- don’t be afraid to pound away; the majority of the excess water will be pressed away from the tofu, leaving a mushy substance the consistency of cottage cheese.

Place pressed tofu into a large bowl. Using a potato masher, mash tofu. This is a physically fun recipe, between the pounding and mashing…work it!

Add to mashed tofu lemon juice, olive oil, garlic, salt, pepper, and herbs. Mix well.

Add to mixture nutritional yeast.

Be certain to taste ricotta before using. It should resemble the flavor of a mild goat cheese. Do not expect a dairy miracle, OK? But trust me, it’s good and good for you! Refrigerate until ready to use.

Make lasagna:

Preheat oven to 350 degrees.

In a large pasta pot, bring water to a boil. I’ve learned the hard way that one must have plenty of water in order to allow the noodles free range of motion. Use the interior screw marks of the pot handles as a guide; water should go just above this line.

Add to boiling water a dash of salt.

Add into salt water the lasagna noodles. Boil for exactly 10 minutes. No more, no less, as we want just under al dente texture, as the pasta will cook further in the oven…and no one likes mushy pasta. Stir only once in order to avoid the sticky, mushy factor. For real!

After lasagna is under al dente, drain pasta and set aside to cool.

In an oven-safe casserole dish (I prefer a glass dish so that I may keep a watchful eye on the lasagna), layer the following to line the dish bottom:

·         Sauce

·         Noodles (1 strip thick…you may use several strips in order to coat the sauce layer, but do not overlap the noodles atop one another)

·         Ricotta (3 – 4 spoon-fulls, spread evenly)

·         Sauce

·         Noodles

·         Ricotta

Repeat above until ½ inch from the rim of the dish. Make the final layer Noodles covered in sauce (no ricotta at the top)

Place lasagna dish onto a baking sheet and cover dish with foil; place dish/sheet into the heated oven. Bake for 30 minutes; remove foil and bake for an additional 10 minutes in order to crisp top layer of lasagna.

***If meat is desired, I suggest browning the seasoned ground beef, draining the meat, and layering it after the ricotta and before the sauce***

This dish improves with a little time…if refrigerated, try to consume within 3 days. Reheat in foil-covered dish for 30 minutes.
United in Spatulas,

Chalkaholic

Wednesday, August 1, 2012

Noo Loo - parts 3 & 4

Dear B-Reader,

Let the games begin! Totally vibing Olympics right now...love it! A bathroom remodel is a total team sport...akin to gymnastics, Go, USA Women! I can totally see the gold/granite. :)

Public Relations and Sport Sensei Béla Károlyi played by Dad
Team USA Coach John Geddert played by Jeff
Team USA Coordinator Márta Károlyi played by Chalkaholic
Fierce Five played by Plumbers-Tile Masons-Stone Masons-Carpenters-Drywall Installers

12. A week ago, Sunday, in anticipation of drywall to begin the following day, Dad and Jeff added insulation to the existing exterior wall of the bathroom (wall with window). It has been cold, London-like balmy cold, in our bathrooms, and now we know why. The exterior walls had zero, I mean - stepping with no grace, spinning like a whirling dervish, and taking a falling hop  on the balance beam dismount - score of zero insulation. Not anymore! We are doing a routine with 16.5 degree of difficulty and scoring 16.5, yo!
13. Monday and Wednesday, drywall process began. We originally demo-ed only half of the existing drywall, hoping to preserve some of the original and simply mud over the top, refinish, and paint. However, the master drywall smiths let us know that as drywall ages, it becomes brittle, and the installation of new fixtures such as A/C vents, recessed lighting, etc., would break the old drywall and require replacement in the near future. Therefore, we opted to demo all of the existing drywall and install new, glorious drywall. The "tape and float" process smells like teenager sports socks. Gross
14. Friday, drywall completed. One small snag...they originally drywalled over the cool outlet for the hair tool caddy. Chalkaholic's documentary-style photography to the rescue...drywall installer used the photo as a map to the location of the outlet and simply cut it out of the drywall. Tile masons installed their version of water-resistant drywall, Perma-something, in the shower area and built up the shower bench. They Perma-something was "taped and floated" using a deathly-looking and -odoriferous red substance...reminded me of what blood would appear to be in a person exposed to toxic levels of radiation (I think my summer reading of The Hunger Games series is warping my imagination). All work completed just in time for the 2012 London-to-Houston Opening Ceremony Party at Chalkley Stadium.
15. Saturday and Sunday, clean, clean, clean, rest, rest, rest.
16. Monday, tile was laid on shower walls-ceiling-floor. Floor of the remainder of bathroom was mudded to prep for the tile to be laid the following day.
17. Tuesday, tile was laid on mudded floor. All tile was grouted a beautiful, khaki color. Granite was laid atop the shower threshold and the shower bench for a completed, hotel-quality look. Actually, saw this look in London's The Ruben's at the Palace boutique hotel this past spring.
18. Today, Wednesday, was quite an ordeal. HVAC is a topic for a whole, separate blog entry...let's just say that I have met with the inspector now three times and a different member of the installation team for a total of five times. I feel like we are trapped on the uneven bars without a spotter...but plenty of chalk dust surrounding us. Back to topic, cabinets were delivered and half-way installed (guess why...A/C...how did you know???). Granite stone mason came out to measure the vanity top so that the granite is sized perfectly to match the glorious, espresso vanity cabinet. Ah, so dreamy. Thanks to Dad and Jeff for being go-betweens and refocusing me to keep my eye on the prize.

And, your favorite part of the games, the pics of the events:

Insulation installation.
Drywall covering the whole between the two bathrooms (where the hall bathroom's original linen closet was taken over in order to enlarge the master bathroom shower).
 Drywall installation at exterior wall (where window was and where vanity will be).
 Drywall installation around shower (not IN shower, as drywall must remain dry).
 Perma-something installation and shower bench...welcome to my haunted house.
 Tile and granite on shower and bench.
Another view of shower tile and granite.
 Complete view of shower.
Vanity cabinet installation. The open space on the left is where the cool hair tool caddy will reside...being built as I type...


Cheerio,
Chalkaholic